Showing posts with label tutorial. Show all posts

Monday, October 10, 2011

Fungi…

little mushroom pincushions

Do you pintrest? I do. It’s amazing the things you can see on there! Things you wouldn’t normally stumble across unless your whole life is spent online.

I found a darling, and new to me, pincushion tutorial that I thought I would share with you. Aimee Ray over at Little Deer Tracks shares it with us. While you’re there you should check out her other crafting goodies…they’re adorable!

Saturday, January 29, 2011

A Strawberry Tutorial for You…

Supplies:  wool felt in green, white and red; white beads; yellow beads; beading thread or very strong sewing thread; green yarn or embroidery floss.

1. Start with a circle shape, I used three sizes (2 3/4”, 3 1/2” & 4 1/4” across) cut it in half.  I like to use freezer paper with the felt as you can iron it onto your felt and then cut your shape…makes life much easier.

2. sew straight edges together, turn right side out.

3. sew a gathering stitch around the top and stuff with fiberfill. Really stuff that little sucker good!!!  You’ll be amazed by how much fiberfill you can get in there! You could stuff it with a little sand or bb’s for weight but make sure to have fiberfill in the top portion to hold it all in.  Pull gathering stitches tight and tie off.

4. take a length of your yarn (about 7-8”) and tie a knot in the end. Poke knot into top hole. Using the thread that is left on your needle, pulling tightly, sew back and forth across the hole and occasionally going through the yarn until the hole is completely closed.

5. sew white beads randomly around the berry pulling tightly so you create a divot where the “seed” is. Knot off in the top of the berry by doing a few backstitches.

6. for the leaves, cut out two starfish like shapes, one slightly smaller than the other.  cut a hole in the center and pull yarn through the larger one.  sew leaf down by coming out near the juncture of two “leaflets” and back out the center.  repeat around the whole leaf cap.  repeat with the smaller leaf cap.

7. cut out a 5 petal flower or two for the top. sew to top and add yellow beads to the center.

There you go! Hope you find my instructions clear enough.

Saturday, February 14, 2009

Pincushion Love...

So, I like, LOVE pincushions! Especially ones I can make out of wool felt.

Here is a book that I bought a while ago:

Really great book! I have made a couple from it like the ones on the cover and they turned out really cute!

I am going to start keeping a list in my sidebar of all the pincushion tutorials that I like. Most of them I haven't made yet, but I plan to! If you make any of them, please let me know, I'd love to see your versions!

Wednesday, December 10, 2008

15...My Sewing Tutorial Roundup

Days to go...

Here are a bunch of the tutorials I have saved in my favorites. I really want to make these up! I have so many WIP's though, that if I don't start finishing some of those first, there won't be any more room in my house (read: places to stack each of my different projects that I am working on!). If I make one more pile, Spartan will leave me...of course that would allow for more places to put more works in progress...

Just click on the pictures to go to the site where the tutorial is posted!


Fabric basket


Covered measuring tape


Hair clips (these will be in Baby Girls stocking this year!)


Cutest little monkey


CD coasters (My parents will be getting a set of these!)

Travel Doll House (Baby Girl...need I say more?)

Sparkle mittens (next year...)

Checkbook cover

Tuesday, August 26, 2008

Cheating Slippers

Okay, so I'm cheating on the blog entry. This one is a blast from the past and a past blog. I love these slippers by the way! Unfortunately (don't tell my Son I said that!), I don't get to wear them anymore because my darling #3 Son got me fuzzy slippers for Christmas and as I would never dream of disappointing him, I only wear his slippers around the house now. Enjoy!


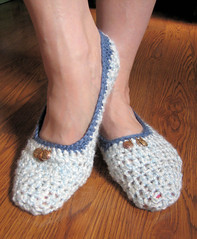
Comfy Ballet Slippers

Phone Pictures 042

Supplies:
K & I hook
Lion Brand Baby Homespun (any homespun would work)
Caron Simply Soft ww
Stitch abbreviations:
Ch – chain
hdc – half double crochet
sc – single crochet
st/s – stitch/es
sl st – slip stitch
fo – finish off

Start with a magic circle or ch2 and work in 2nd ch from hook – ch2 at end of row does not count as 1st hdc of each row.

1. 6hdc in circle (or 2nd ch) join, ch2 (6sts)
2. 2hdc in each stitch around, join, ch2 (12sts) – weave in end now as it will be harder later
3. 1hdc in next st, 2hdc in next st, repeat around, join, ch2 (18sts)
4-5. hdc around, join ch 2 at end of each round
6. 1hdc in next st, 2hdc in next st, repeat around, join, ch2 (27)
7-8. 1 hdc in each st around, join, ch2
9. hdc in next 15sts, ch2, turn
10-21. 1hdc in each st across ch2 turn

Test fit before finishing off, you may need to increase or decrease rows for a custom fit. Remember you want a snug fit.
22. 1 hdc in each st across, fo leaving a long tail

With right sides held together and using tail from last row, fold heal in half and whip st heel seam. Weave in ends.

Using ww yarn and starting at the halfway point in the heel, sc evenly around to corner st where toe meets side. Do a hdc in the corner st. Sc over toe area with a hdc in the other corner. Finish sc around to where you started join.

Switch to I hook
Ch2, hdc in first 3sts sc to 1st toe corner, sl st across toe to corner, sc down side to last 3 st. Hdc in last 3sts, join.
Ch1, sc to corner of toe doing 3 decreases spaced evenly along the side, sl st across toe, sc back to beginning doing 3 decreases evenly on this side too. Join, fo.

Note: For me, because I have such a narrow heel, I re-attached the ww yarn about 2 1/2” away from the center of the heel and worked a row of sl st around the back, across the heel to 2 ½” down the other side.

I also whip stitched some felt into the area where the ball of the foot goes as I don’t like the feel of the “bumps” from the stitches.

You can embellish or not, whatever is your preference!

If you find any errors, please drop me an email. I am the only one who has made these and they have not been tested. Enjoy!